
Posted by Richard G. on Oct 7th 2026
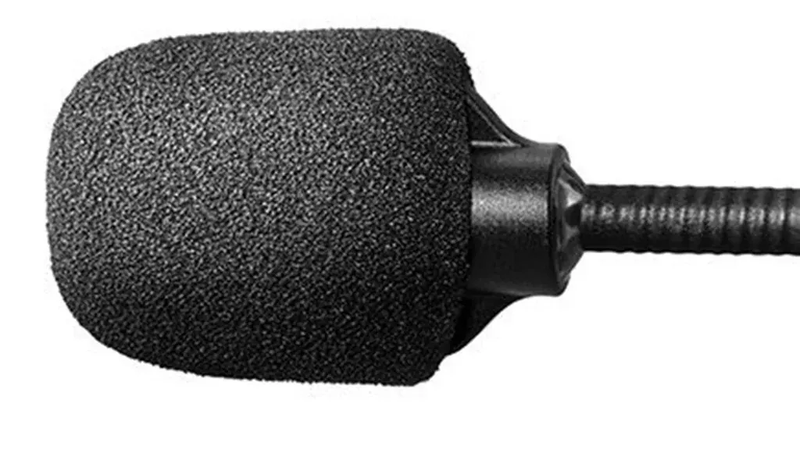
An aviation headset mic muff is a small foam windscreen, but it has an important job. It helps protect the microphone and reduce wind, breath, moisture, and cockpit noise in the transmitted signal. Aviation headset mic muff replacement is usually due when the muff is soiled, worn, loose, torn, or no longer stays over the microphone securely. There is no universal calendar interval. Replace it based on condition, fit, and the quality of your radio transmissions.
Shop aviation headset mic muffs and windscreens at Marv Golden Pilot Supplies.
When should you replace an aviation headset microphone muff?
Replace an aviation headset microphone muff as soon as visible wear, contamination, or a poor fit affects microphone protection or communication quality. Common signs include a foam cover that is cracked, compressed, stained, shedding, or difficult to keep in position. If cleaning does not restore the muff and the replacement fits your microphone, a new cover is the sensible first step before investigating a more serious headset fault.
- The foam is torn or crumbling: Gaps can leave the microphone exposed and allow more breath or cockpit noise into the signal.
- The muff is permanently flattened: A compressed cover may no longer sit around the microphone as intended.
- The surface is soiled: Oil, sweat, food residue, and dust can build up on a part that sits close to your mouth.
- The muff slips during use: A loose cover can move away from the microphone or expose its sound ports.
- Wind or breath noise has increased: If the headset and aircraft connection are otherwise working, a worn windscreen may be contributing to the change.
- The O-ring or retaining band is stretched or missing: The foam may be in good condition but still need a new securing ring or band.
A muff is a wear item, not a repair for every microphone problem. If the microphone remains intermittent, distorted, silent, or unusually noisy after you install a correctly matched replacement, stop treating the foam as the likely cause. Check the boom position, headset connection, aircraft intercom, microphone type, and headset service guidance on the ground.
What does a mic muff do on an aviation headset?
An aviation headset mic muff is a removable foam microphone windscreen that surrounds the microphone without blocking normal speech. It helps limit the effects of moving air, breath sounds, moisture, dirt, and some ambient cockpit noise. The cover supports clearer voice transmission, but it does not replace a functioning microphone, noise-canceling design, aircraft intercom, or proper microphone placement.
The words mic muff, microphone windscreen, microphone protector, and foam microphone cover are often used for similar accessories. The construction and fit can differ. Some products are a foam sleeve held by an O-ring. Others use a retaining band, hooks, or a two-part cover. That is why a universal-looking foam cover is not automatically compatible with every aviation headset.
For example, the Bose microphone mic muff sold by Marv Golden is listed for Bose A30, A20, and ProFlight Aviation Headsets. The David Clark M-7, M-7A, and M-55 MIC Muff is listed for specific David Clark microphone and headset series. Those model details are more useful than choosing by appearance alone.
How can you tell whether the problem is the muff or the headset?
Inspect and test the headset on the ground before ordering a part. A worn muff can contribute to wind or breath noise. But it should not normally cause a complete loss of audio, a dead microphone, or an intermittent connection by itself. Separating an accessory problem from an equipment or aircraft problem helps you avoid replacing the wrong part.
- Look at the foam: Check for tears, holes, hardening, flattening, loose fibers, stains, or missing sections.
- Check the fit: Confirm that the cover completely surrounds the microphone and does not slide away from its sound ports.
- Inspect the retaining piece: Look for a stretched O-ring, damaged band, or broken hook that cannot hold the muff in place.
- Check microphone placement: Put the boom in its normal operating position. Follow the headset maker's guidance for the correct distance and orientation.
- Test with a known-good connection: If practical, compare the headset in a known-good jack or compare another headset in the same aircraft position.
- Listen for the actual symptom: Increased wind, popping, or breathy noise points toward the cover or placement. No transmit audio, intermittent audio, or electrical noise may require headset or intercom troubleshooting.
Do not diagnose an unreliable communication system while airborne. If radio communication is not dependable, use the aircraft's approved alternate communication procedures and have the headset or aircraft system checked before the next flight.
Should you clean an aviation headset mic muff or replace it?
Cleaning can extend the useful life of a washable mic muff when the foam is intact and still holds its shape. Replacement is better when cleaning cannot remove the soil, the material has become brittle, or the cover no longer fits securely. Follow the product or headset manufacturer's care instructions rather than soaking an accessory that is not designed to be washed.
Bose's official A20 guidance says to remove the microphone windscreen, rinse it, air dry it completely, and reattach it. Bose also gives a replacement procedure: remove the securing band, gently slide off the old windscreen. Slide the new windscreen fully over the microphone, and position the replacement band near the end of the windscreen. Read the instructions for your exact headset model in the Bose microphone windscreen replacement guide before servicing a Bose headset.
In general, use these care rules:
- Remove the muff gently rather than pulling on the microphone boom.
- Use only the cleaning method specified by the manufacturer.
- Let a washable cover dry completely before putting it back on the microphone.
- Do not use a damaged foam cover simply because it can still be stretched over the mic.
- Replace the O-ring or retaining band when it no longer keeps the muff in its correct position.
How can you make a replacement mic muff last longer?
Good storage and gentle handling can reduce premature wear. Before putting the headset away, check whether the foam is damp from perspiration or cleaning. Let it dry fully according to the manufacturer's care instructions. Avoid crushing the microphone boom or storing the headset where another item presses directly against the foam. Repeated compression can flatten the cover and make it less likely to stay centered on the microphone.
Keep the muff away from lotions, food residue, solvents, and other substances that can weaken or soil foam. Do not pull the cover off by the boom. Instead, move the retaining band or O-ring as directed, then ease the foam away from the microphone. A small accessory can be easy to replace, but rough removal can damage the microphone assembly or stretch the part that holds the new cover in place.
It also helps to inspect the muff during normal preflight preparation, especially when the headset is shared or used frequently. Look for a change in shape, surface texture, or fit before a communication problem appears. If the cover is already hard, cracked, or loose, replace it before the next flight rather than relying on a temporary stretch or improvised tie. A spare model-matched muff in a flight bag can be useful, but it should remain packaged and protected from heat, dirt, and crushing.
These habits do not establish a fixed replacement schedule. They simply make condition checks easier and help you catch a worn windscreen before it distracts from troubleshooting a radio or intercom issue.
How do you choose the right replacement mic muff?
Choose a replacement by microphone type, headset model, attachment method, and the shape of the microphone. The most important question is not whether the foam looks similar. It is whether the cover is designed for the microphone in your headset and can remain correctly positioned during normal use.
| What to check | Why it matters | Where to confirm it |
|---|---|---|
| Headset brand and model | Different boom and microphone assemblies need different covers. | Headset label, owner guide, or product record. |
| Microphone type | Electret and dynamic microphones may use different accessories. | Manufacturer documentation or the exact product listing. |
| Attachment method | An O-ring, band, hook, or sleeve must hold the muff securely. | Existing accessory and replacement instructions. |
| Coverage | The muff should cover the microphone as the manufacturer intends. | Installation instructions and product photos. |
| Condition of the microphone | A new muff cannot correct a damaged or failing microphone. | Ground test and qualified service guidance. |
Marv Golden's accessory catalog includes model-specific options for Bose, David Clark, and ASA headsets, along with other microphone covers. The ASA Mic Muff with O-Ring is listed for electret-type microphones and specifically notes that it does not fit most dynamic microphones. Which are commonly associated with military low-impedance headsets. That distinction is a reminder to verify the microphone type before ordering.
If you are unsure, note the headset brand, model, microphone marking, connector type, and a clear photo of the existing cover. That information is more useful than a description such as "the black foam piece."
How do you replace an aviation headset microphone muff?
Most foam windscreens are simple to replace, but the installation should leave the microphone fully covered and the retaining piece correctly positioned. Work at a clean table with the headset disconnected from the aircraft and follow the instructions for the specific model.
- Disconnect and inspect: Remove the headset from the aircraft connection and identify the microphone, cover, and retaining ring or band.
- Remove the old cover: Roll or remove the retaining piece as directed, then gently slide the foam off without pulling on the boom or microphone.
- Compare the replacement: Confirm the new muff matches the model and microphone type before installing it.
- Install the foam: Slide it over the microphone so it sits fully in the intended position and does not cover the wrong openings.
- Secure it: Reinstall the O-ring, band, hook, or other retaining part. It should hold the foam without crushing it.
- Perform a ground check: Test transmit and receive audio, listen for changes in wind or breath noise, and confirm the muff stays in place when the boom is adjusted normally.
Do not modify the foam, drill extra holes, stretch the O-ring beyond its intended use, or substitute a cover that blocks a microphone port. If the new part does not fit as documented, return to the compatibility check instead of forcing the installation.
When is a new mic muff not enough?
A replacement windscreen is appropriate for a worn accessory, but it is not a substitute for headset service. Escalate the problem when the headset has intermittent transmit or receive audio, a damaged cable, exposed wiring. Loose plugs, repeated feedback, distortion, loud tones, or symptoms that continue with a correctly installed new muff. These problems can involve the microphone, boom, cord, connector, intercom, or headset electronics.
Keep the headset out of flight service until communication is reliable. Consult the manufacturer or a qualified aviation technician for faults that cannot be isolated safely on the ground. A low-cost accessory should never encourage a pilot to accept uncertain communications in flight.
Frequently asked questions
How often should an aviation headset mic muff be replaced?
Replace it when the foam is worn, soiled, torn, flattened, loose, or no longer protects the microphone and supports clear transmissions. Usage, cockpit environment, cleaning, and storage affect service life, so condition is a better guide than a fixed calendar interval.
Can a dirty mic muff make my transmission sound bad?
Yes, a dirty or damaged cover can contribute to wind, breath, popping, or background noise. Clean it only if the manufacturer allows that method. If the symptom remains after a correct replacement and ground test, investigate microphone placement, the headset, the aircraft intercom, or the connection.
Does every aviation headset use the same mic muff?
No. Replacement covers can differ by headset model, microphone type, shape, and attachment method. Some are intended for electret microphones, while others fit specific dynamic or manufacturer microphone assemblies. Verify the product listing and manufacturer guidance before ordering.
Can I fly with a missing mic muff?
A missing muff can increase wind, breath, moisture, or background noise and may leave the microphone less protected. Replace it before relying on the headset for normal operations, then perform a ground communication check. Do not continue a flight with unreliable communications.
What should I do if a new mic muff does not solve the noise?
Confirm that the replacement matches the microphone, fully covers it, and is secured correctly. Then check boom placement, plugs, jacks, intercom settings, and the headset on the ground. Persistent distortion, intermittent audio, or no transmit signal calls for manufacturer or qualified service rather than another foam cover.
Aviation headset mic muff replacement is a small maintenance task with a simple decision rule. Replace the cover when its condition or fit has degraded. Verify compatibility before ordering. Treat persistent communication faults as a headset or aircraft troubleshooting issue. A correctly fitted muff helps the microphone do its job, but reliable flight communication still depends on the complete system.